Embrace Timeless Charm: DIY Burlap Mason Jars for Rustic Farmhouse Decor in Every Season
There's an undeniable allure to farmhouse decor – a blend of cozy comfort, rustic simplicity, and a touch of timeless elegance. At the heart of this beloved aesthetic lies versatility, and few craft projects embody this more perfectly than DIY burlap mason jars. These charming creations are not just a fleeting trend; they are a staple that can transform your home with minimal effort and cost, adapting beautifully to every season and celebration. If you're looking for an easy, budget-friendly way to infuse your living space with warmth and character, you've found your next favorite project!
You might think, "Burlap mason jars? Haven't those been done?" And you'd be right! A quick search reveals countless variations, a testament to their enduring appeal. But the beauty of this craft lies in its endless customization. It's not about being the first to discover the idea; it's about making it uniquely *yours*. From selecting the perfect shade of burlap to adding seasonal embellishments, this guide will inspire you to craft your own version, ready to bring rustic charm into your home all year round.
Why Burlap Mason Jars Are Your Go-To DIY Project
The appeal of crafting your own burlap mason jars extends far beyond their charming appearance. They offer a multitude of benefits that make them a favorite among DIY enthusiasts and home decorators alike:
- Unparalleled Versatility: Whether you're aiming for a cozy autumn vibe, a fresh spring feel, or a festive holiday spirit, burlap adapts. Its neutral texture serves as the perfect canvas for any seasonal theme, making these jars suitable for year-round decor.
- Budget-Friendly Decor: High-quality home decor can often come with a hefty price tag. This project, however, proves that style doesn't have to break the bank. With just a few inexpensive supplies, many of which you might already have or can find at dollar stores, you can create stunning pieces that look far more expensive than they are. For more wallet-friendly ideas, check out our guide on Budget-Friendly Burlap Mason Jars: Dollar Store DIY & More.
- Effortless to Create: Seriously, this is a craft that takes minutes, not hours. Even if you're a complete beginner to DIY, you'll find these jars incredibly simple to assemble, offering instant gratification and a beautiful end result.
- Endless Customization: While the core concept remains the same, the possibilities for personalization are limitless. Mix and match burlap colors, incorporate lace or other ribbons, experiment with different types of twine, and select unique seasonal fillers to truly make each jar your own.
Gathering Your Supplies: The Foundation of Your Rustic Masterpiece
One of the best aspects of this DIY project is the simplicity of the materials needed. You don't need a sprawling craft room or specialized tools; just a handful of items will suffice. Most can be found at your local craft store, big-box retailers, or even dollar stores, making this an accessible project for everyone.
Essential Crafting Materials:
- Mason Jars: The star of the show! You can use any size or style of mason jar, from small jelly jars to large canning jars. Consider what you'll use them for – smaller jars are great for votives, while larger ones make excellent centerpieces. Don't worry about minor imperfections; they only add to the rustic charm!
- Burlap Fabric or Ribbon: This is where you can start to get creative. While natural, unbleached burlap is classic, don't shy away from experimenting with colored burlap (cream, white, even subtle pastels or bolder hues for specific seasons) or pre-cut burlap ribbon. Burlap ribbon often comes with finished edges, simplifying the process even further.
- Jute Twine: This natural fiber perfectly complements burlap, enhancing the rustic aesthetic. Look for a medium-thickness twine that's easy to tie and provides good texture.
- Scissors: A good pair of sharp scissors will make cutting burlap much easier and cleaner.
- Measuring Tape or Ruler: Essential for ensuring your burlap strips are uniform and fit your jars perfectly.
- (Optional) Hot Glue Gun & Glue Sticks: While not strictly necessary if you're just tying the burlap, a dab of hot glue can help secure the burlap ends for a neater, more permanent finish, especially if your jars will be handled frequently.
Seasonal Embellishments & Fillers (Where the Magic Happens!):
This is where your burlap mason jars truly transform for each season. Think beyond just flowers!
- Spring/Summer: Fresh cut flowers (like sunflowers, as mentioned in our inspiration, daisies, tulips, lavender), faux floral picks, small decorative birds, pastel ribbons, faux berries, or even clear fairy lights.
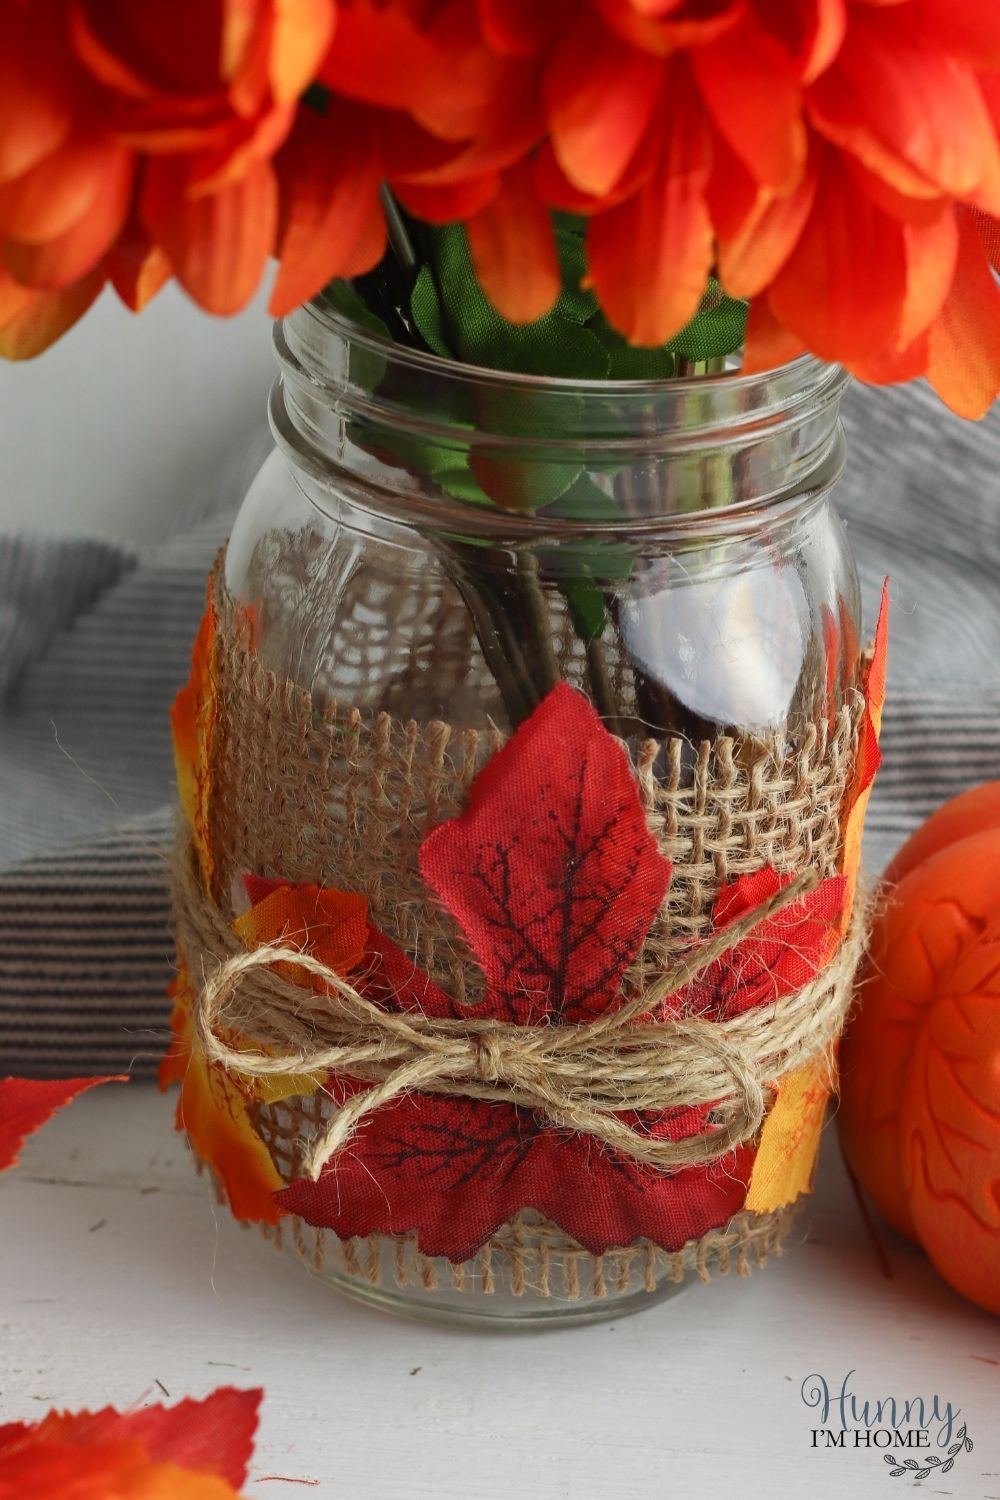
- Autumn: Faux autumn leaves (easily found at dollar stores during fall), small pumpkins or gourds, cinnamon sticks, dried corn, pinecones, wheat stalks, fall-themed floral picks, or a simple candle.
- Winter/Holidays: Small evergreen sprigs, cranberries, mini ornaments, glittery faux snow, red and green ribbons, tiny bells, frosted berries, or battery-operated LED candles for a warm glow.
- General: Lace trim, other decorative ribbons, buttons, charms, or even stencils to add painted designs to the burlap.
Crafting Your Burlap Mason Jars: A Simple Step-by-Step Guide
You'll be amazed at how quickly these charming jars come together. This project is ideal for an afternoon craft session, a quick decor update, or even a group crafting event. For a more detailed walkthrough, don't forget to visit Make Burlap Mason Jars: Your Easy DIY Guide for Rustic Charm.
- Measure and Cut Your Burlap:
- First, decide how much of the jar you want to cover. A strip between 4-6 inches wide generally works well for standard pint-sized mason jars. Many crafters find that 4 inches leaves a nice amount of glass showing, creating a balanced look.
- Wrap the burlap loosely around your mason jar to estimate the length. You'll want enough to overlap the ends by about 1-2 inches in the back.
- Using your measuring tape and scissors, carefully cut your burlap to the desired width and length. If you're using burlap fabric and are worried about fraying, you can lightly fray the edges yourself for a more natural look, or use fabric glue on the cut edges.
- Wrap the Jar:
- Position your cut burlap strip around the center of your mason jar.
- Wrap the burlap tightly and evenly, ensuring it sits flat against the glass.
- Overlap the ends neatly in the back of the jar. If you're using hot glue, apply a thin line of glue along one edge of the overlap and press the other end firmly into place. This creates a secure, seamless finish. If not gluing, just ensure the overlap is snug.
- Tie with Twine:
- Take a length of jute twine – about 18-24 inches should be sufficient.
- Wrap the twine around the burlap, near the top edge or in the middle, depending on your preferred style. You can wrap it once, twice, or even several times for a thicker look.
- Tie the twine securely into a simple knot or an elegant bow. Experiment with different knot styles or even add a small charm to the knot.
- Trim any excess twine ends for a clean finish.
- Embellish and Fill:
- Now for the fun part! Add your chosen seasonal embellishments. This could be a sprig of faux leaves tucked under the twine, a piece of lace glued over the burlap, or a few small berries threaded onto the twine.
- Finally, fill your newly decorated burlap mason jars with fresh flowers, faux botanicals, a flickering LED candle, or any other decorative filler that suits your seasonal theme.
Seasonal Inspirations & Creative Uses for Your Burlap Mason Jars
The true magic of burlap mason jars lies in their adaptability. With a few simple changes to their adornments and contents, they can seamlessly transition from one season to the next, becoming a centerpiece of your home decor.
Spring & Summer Radiance:
Envision your jars adorned with crisp white or cream burlap, tied with delicate white lace alongside the jute twine. Fill them with bright, cheerful sunflowers, a vibrant mix of tulips and daffodils, or sprigs of fragrant lavender. For a summer garden party, use them to hold cutlery or as charming tea light holders on an outdoor table. A light blue or soft green burlap can also evoke a refreshing spring feel.
Autumnal Warmth:
As the leaves begin to turn, embrace the rich hues of fall. Wrap your jars in natural or burnt orange burlap. Tuck in faux autumn leaves, sprigs of dried berries, small decorative gourds, or cinnamon sticks under the twine. Fill them with rustic fall picks, fluffy cotton stems, or flickering LED pillar candles to cast a warm, inviting glow. These make perfect additions to a Thanksgiving tablescape or a cozy fireplace mantel.
Winter Wonderland & Holiday Cheer:
For the colder months and festive holidays, elevate your burlap mason jars with touches of sparkle and traditional colors. Try a darker, more coarse burlap with crimson or forest green ribbons tied alongside the twine. Adorn them with small pinecones, faux frosted berries, miniature ornaments, or sprigs of evergreen. Fill with battery-operated fairy lights for a magical glow, or use them to hold candy canes or other holiday treats.
Beyond the Vase: Functional & Event Uses:
These versatile jars aren't just for flowers!
- Candle Holders: Place votive or tea light candles inside for a soft, ambient glow. Ensure proper ventilation if using real flames.
- Utensil Caddies: Perfect for a rustic buffet or BBQ, holding forks, spoons, and knives.
- Desk Organizers: Keep pens, pencils, and other office supplies tidy with a touch of farmhouse style.
- Gift Packaging: Fill with homemade treats, craft supplies, or a small gift, then top with a personalized tag for a thoughtful present.
- Party Favors: Create smaller versions to give as wedding or shower favors, filled with seeds, candy, or personalized messages.
- Bathroom Storage: Organize cotton swabs, cotton balls, or makeup brushes in a stylish way.
Conclusion: Your Journey into Rustic Farmhouse Decor
Crafting your own burlap mason jars is more than just a DIY project; it's an invitation to infuse your home with personalized charm, season after season. It’s a testament to the power of simple materials and a little creativity to transform everyday items into cherished decor pieces. Whether you're drawn to the rustic elegance for a special event, inspired by a friend's wedding decor, or simply looking to add a touch of farmhouse comfort to your daily life, these versatile jars are the perfect solution. So gather your supplies, let your imagination take flight, and enjoy the process of creating beautiful, unique decorations that will bring joy and warmth to your home all year long.
