Make Burlap Mason Jars: Your Easy DIY Guide for Rustic Charm
In the world of home decor, few items blend rustic simplicity with undeniable charm quite likeWhy Burlap Mason Jars Are a Must-Have for Your Home
The appeal of- Timeless Rustic Appeal: Burlap, with its natural fibers and earthy tones, instantly evokes a sense of country living and vintage charm. When paired with the classic silhouette of a mason jar, it creates a look that is both inviting and effortlessly stylish.
- Unmatched Versatility: From elegant wedding centerpieces to everyday kitchen organization,
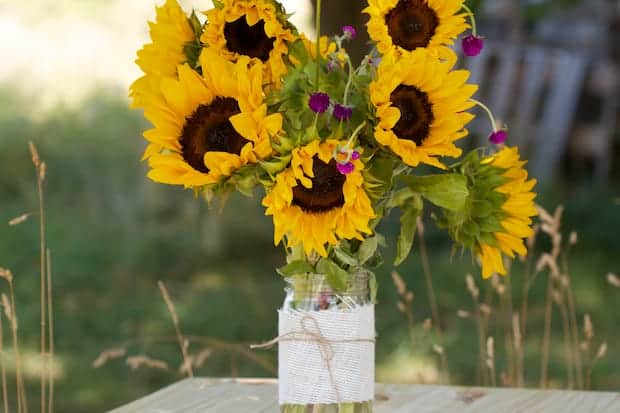
burlap mason jars fit seamlessly into various settings. They can be dressed up or down, making them perfect for any occasion or season. Imagine them holding fresh sunflowers in summer, faux maple leaves in autumn, or festive pinecones during the holidays. - Budget-Friendly Decor: Crafting your own decor is almost always more economical than buying pre-made items, and
burlap mason jars are no exception. Mason jars are often inexpensive or can be repurposed, and burlap can be purchased affordably as fabric or ribbon. Many additional embellishments can even be found at dollar stores, making this a truly budget-conscious project. For more creative ideas that won't break the bank, explore Budget-Friendly Burlap Mason Jars: Dollar Store DIY & More. - Endless Customization: While the basic concept is simple, the opportunities for personalization are vast. You can experiment with different burlap colors (from natural tan to cream, or even dyed options), add lace overlays, mix and match twine types, or embellish with paint, stencils, charms, and faux foliage. This ensures that no two
burlap mason jars are exactly alike, allowing your unique style to shine through. - Quick and Easy DIY: You don't need extensive crafting skills or hours of free time to create beautiful
burlap mason jars . Most projects can be completed in mere minutes, making it a satisfying endeavor for even the busiest individuals.
Gathering Your Simple Supplies: What You'll Need
One of the greatest advantages of this DIY project is the minimal list of supplies required, most of which are readily available at craft stores, hardware stores, or even around your home.- Mason Jars:
- Sizes: Standard pint, quart, or even half-gallon jars work wonderfully. Consider the final use: smaller jars for votives, larger ones for flower arrangements or utensil holders.
- Style: Regular mouth or wide mouth – the choice is yours! You can also hunt for vintage jars with unique markings for extra character.
- Source: Repurpose old canning jars, buy new ones in bulk, or look for affordable options at thrift stores or dollar stores.
- Burlap:
- Burlap Fabric: Purchasing burlap by the yard gives you the most flexibility to cut strips of any width and length. It often comes in natural tan, cream, or off-white, but dyed options are also available.
- Burlap Ribbon: This is a convenient alternative as it's pre-cut to specific widths (e.g., 2-inch, 4-inch, 6-inch) and often has finished edges, reducing fraying. Look for it in the floral or craft aisle.
- Colors & Textures: Experiment with different weaves and colors. A finer weave might offer a more refined look, while a coarser weave enhances the rustic feel. Cream burlap, for instance, provides a softer backdrop than traditional tan.
- Twine:
- Jute Twine: This is the classic choice for its natural, earthy look and strong rustic appeal.
- Other Options: Consider baker's twine for a pop of color, hemp cord for a slightly different texture, or even thin raffia for a more organic feel.
- Adhesive:
- Hot Glue Gun: This is often the quickest and most effective method for securing burlap to glass, offering an instant strong bond. Use caution to avoid burns.
- Fabric Glue: A good alternative if you prefer not to use a hot glue gun. Ensure it dries clear and provides a strong hold on fabric to glass.
- Double-Sided Tape: Can work for a temporary hold or with very lightweight burlap ribbon, but may not be as secure as glue for long-term decor.
- Scissors: Sharp craft scissors are essential for clean, straight cuts through burlap.
- Measuring Tape or Ruler: For precise measurement of your burlap strips.
- Optional Embellishments:
- Lace or Fabric Strips: Add delicate lace ribbon over or under the burlap for a touch of elegance.
- Faux Flowers & Leaves: Small autumn leaves, berries, sunflowers, or tiny floral picks can be glued on for seasonal flair.
- Charms & Buttons: Tiny metal charms, wooden buttons, or even small seashells can add personalized details.
- Paint/Stencils: For decorating the exposed glass or even the burlap itself.
Step-by-Step Guide to Crafting Your Burlap Mason Jars
Making your own- Step 1: Prepare Your Mason Jar
Ensure your mason jar is sparkling clean and completely dry. Any residue or moisture could prevent your adhesive from bonding properly. Remove any labels and wash thoroughly with soap and water, then dry completely.
- Step 2: Measure and Cut Your Burlap
- Determine Width: Decide how much of the jar you want to cover. A strip between 4-6 inches wide is a common starting point. For a more subtle look with more glass showing, opt for a 4-inch strip. For fuller coverage, go wider.
- Determine Length: Wrap the burlap strip around the mason jar, allowing for a 1/2 to 1-inch overlap. This overlap will be where you secure the ends, creating a neat seam. Cut the burlap cleanly with sharp scissors. Tip: Burlap tends to fray; embrace this for extra rustic charm, or use burlap ribbon with finished edges to minimize fraying.
- Step 3: Secure the Burlap to the Jar
- Apply Adhesive: Apply a thin line of your chosen adhesive (hot glue or fabric glue) along one short end of your burlap strip.
- Wrap and Secure: Place the glued end onto the back of your mason jar (where you want the seam to be). Hold it firmly until it adheres. Then, carefully wrap the burlap tightly around the jar, ensuring it's straight and taut.
- Overlap and Finish: Once wrapped, apply another thin line of adhesive to the overlapping end of the burlap and press it down securely onto the first end, creating a clean, strong seam at the back of the jar.
- Step 4: Add the Twine Accent
Now for the rustic finishing touch! Take your jute twine (or other chosen cord) and wrap it around the neck of the jar, or over the burlap seam you just created, several times. This helps to further secure the burlap and adds decorative interest. Tie the ends into a simple knot, a neat bow, or a double knot with trimmed ends for a minimalist look. You can wrap it around the entire burlap section if you prefer, or just a small portion.
- Step 5: Personalize and Embellish (Optional)
This is where your creativity truly shines! Attach a strip of lace over the burlap for a softer, more elegant touch. Glue on small faux flowers, leaves (perfect for fall), miniature pinecones, or berries depending on the season. You can even use a stencil and some craft paint to add a design to the exposed glass or the burlap itself. For a continuous look across seasons, don't miss our guide on Rustic Farmhouse Decor: DIY Burlap Mason Jars for Every Season.
Creative Uses and Styling Ideas for Your Burlap Mason Jars
Once your- Charming Flower Vases: This is arguably the most popular use. Fill them with fresh-cut garden flowers like sunflowers, daisies, wildflowers, or elegant roses. They're also perfect for dried floral arrangements or faux botanicals, offering a maintenance-free option.
- Atmospheric Candle Holders: Place flameless LED pillar candles or votives inside for a warm, inviting glow, especially beautiful for evening ambiance. Always use flameless options for safety when combining with burlap.
- Organized Storage Solutions: Use them to corral kitchen utensils, pens and pencils on a desk, craft supplies, or even toiletries in a bathroom. Their rustic look adds charm to any organizational setup.
- Festive Centerpieces: Arrange a collection of varying sizes of
burlap mason jars as a centerpiece for dining tables, coffee tables, or mantelpieces. Fill them with seasonal items – think mini pumpkins and gourds for autumn, ornaments and cranberries for winter, or colorful Easter eggs for spring. - Thoughtful Gift Jars: Fill a decorated
burlap mason jar with homemade cookies, bath salts, candy, or a small plant for a personalized and heartfelt gift. It's perfect for housewarmings, birthdays, or hostess gifts. - Event Decor: Their rustic elegance makes them ideal for weddings, bridal showers, baby showers, or garden parties. Use them as aisle markers, table numbers, or part of a dessert bar display.
- Seasonal Decor Accents: Easily update your home decor for different seasons. In fall, add faux leaves and berries. For winter, tuck in pinecones, faux snow, or small ornaments. Spring calls for pastel ribbons and small blossoms, while summer embraces vibrant colors and beach-themed items like sand and seashells.
